Key Takeaways
- How to repot a plant correctly: water 24 hours before, choose a pot 2–3cm wider, use fresh potting mix suited to the plant, inspect the roots, and (for most plants) water thoroughly right after.
- Signs a plant needs repotting include roots emerging from drainage holes, soil drying within 1–2 days of watering, stunted growth, and a plant that becomes unstable or top-heavy.
- A root bound plant shows circling roots, cracked pots, and water running straight through without being absorbed — all signal that repotting is overdue.
- The best time to repot plants is early spring (March–May), when plants are entering active growth and establish fastest in fresh soil.
- Repotting in the wrong season — especially during flowering or winter dormancy — adds unnecessary stress and can trigger leaf or bud drop.
- Transplant shock after repotting is normal and temporary: wilting, drooping, and brief leaf drop usually resolve within 1–3 weeks with correct aftercare.
- Best soil for repotting must match the plant — never use the same mix for succulents and ferns. Our complete soil mix guide covers every plant category.
- How often to repot depends on growth rate — fast growers need repotting roughly every year, slow growers every 2–3 years.
- Browse our full indoor plant care guides for plant-specific repotting notes alongside complete care information.
Why Repotting Is One of the Most Important Plant Care Skills
Repotting plants is one of the most transformative care actions you can take for a struggling houseplant — yet it’s consistently delayed or done incorrectly, even by experienced plant owners. A plant that has outgrown its container is a plant under constant stress: its roots are compacted, competing for water and oxygen in soil that has long since lost its nutrients and structure. Every other care effort — correct watering, good light, regular feeding — becomes progressively less effective once root health is compromised by an inadequate growing space.
Knowing how to repot a plant correctly isn’t complicated, but it does mean getting the timing, technique, soil, and aftercare right to avoid unnecessary transplant shock and help the plant settle into fresh growing conditions quickly.
This guide covers recognizing the signs a plant needs repotting, understanding root bound conditions, the exact step-by-step repotting technique, specific guidance for popular houseplants, transplant shock recovery, and the seasonal planning that keeps your whole plant collection healthy year-round.
Signs a Plant Needs Repotting
Root Bound Plant — The Primary Signal
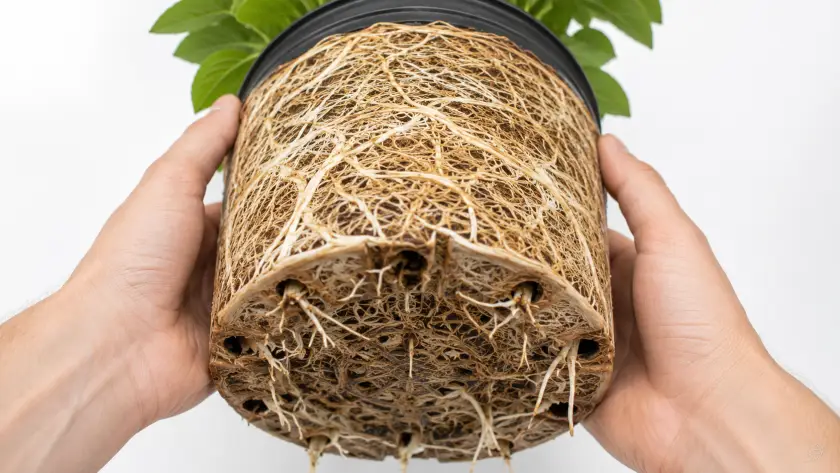
A root bound plant is the most common reason for repotting. When a plant’s roots fill its container completely, with no room for further growth, the plant enters a state of chronic stress that no amount of watering, feeding, or light adjustment can fully fix. Watch for these signs:
- Roots growing out of drainage holes — the clearest signal of all. If roots are visible at the drainage holes, repotting is overdue, not upcoming.
- Soil drying out within 1–2 days of watering — once roots fill the pot, the little soil left dries almost immediately. More frequent watering won’t fix the underlying imbalance; repotting will.
- Water running straight through the pot — in severely root bound plants, water poured in flows through the root mass and out the bottom without being absorbed.
- Stunted or stopped growth — a plant that has run out of root space can’t grow larger even with ideal light, water, and feeding. Check the roots before assuming the problem is light or nutrition.
- A plant that’s become unstable or top-heavy — as the plant outgrows the pot, the ratio tips in the plant’s favor, especially in trailing or tall varieties.
- A cracked or deformed pot — root pressure can crack terracotta or ceramic pots. New hairline cracks are a sign of urgent root bound stress.
- Visible roots on the soil surface — roots circling the top of the pot or lifting the plant upward mean the plant is searching for any growing room left.
When Not to Repot
Knowing when to repot also means knowing when to hold off. Repotting at the wrong moment adds stress that can trigger leaf drop, bud loss, and a longer recovery. Avoid repotting when:
- The plant is actively flowering or has developing buds — bud drop is almost guaranteed.
- The plant is in winter dormancy — roots can’t establish well in cold, low-light conditions.
- The plant is already stressed or struggling — it needs to stabilize first.
- You’ve just brought the plant home — give it 2–4 weeks to adjust before repotting, regardless of its root situation.
When to Repot Plants — A Seasonal Guide
Spring Is Usually Best
The best time to repot most plants is early spring — roughly March through May — as plants enter active growth. Rising temperatures and longer days mean roots establish faster and recovery from any transplant shock is quicker. Reasons spring works best:
- Plants are entering their fastest growth phase, so damaged roots heal and regenerate quickly.
- Warming soil encourages more root activity.
- Longer days supply the light energy plants need to recover.
- There’s a full growing season ahead to establish before growth slows in autumn.
Repotting in Summer — Doable With Care
Repotting in summer is fine for most plants but needs more careful aftercare. Heat increases water loss through the leaves right when the roots are temporarily compromised, which can make transplant shock more severe. If repotting in summer:
- Do it in the morning, when temperatures are coolest.
- Move the plant to a shaded spot for 1–2 weeks afterward.
- Check soil moisture more often — hot weather dries fresh potting mix faster.
- Avoid repotting during a heatwave; wait for a cooler stretch.
Fall Repotting — Urgent Cases Only
Save fall repotting for emergencies: a severely root bound plant under acute stress, active root rot, or a damaged pot. Plants repotted in autumn have little time to establish before winter slows root activity, so they head into the cold season with a compromised root system.
Repotting in Winter — Generally Avoid
Winter dormancy slows root activity sharply, so newly repotted plants struggle to establish in fresh soil. The main exceptions are plants actively growing under supplemental lighting, or urgent root rot that can’t wait for spring — see our guide on root rot: how to identify, prevent, and treat it for the emergency process.
How Often to Repot Plants
How often a plant needs repotting depends mainly on its growth rate:
| Plant Category | Repotting Frequency | Signs to Watch |
|---|---|---|
| Fast-growing tropicals (pothos, philodendron) | Every 12–18 months | Roots at drainage holes |
| Medium growers (peace lily, snake plant) | Every 18–24 months | Soil drying too fast |
| Slow growers (ZZ plant, cacti) | Every 2–3 years | Visible root circling |
| Large specimen plants | Every 3–5 years | Top-dress annually instead |
| Succulents and aloe | Every 2–3 years | Root bound signs |
| Orchids | Every 2 years | Growing medium breaking down |
Should you repot a plant right after buying it? Generally no — give any new plant at least 2–4 weeks to adjust before repotting. Moving house is already stressful; adding repotting stress on top of it usually sets the plant back further than leaving it be for a few weeks. The exception is a plant that’s clearly, severely root bound or sitting in unsuitable soil.
What You Need Before You Start Repotting
Choosing the Right Pot Size
Sizing up correctly is one of the most important decisions in repotting. The instinct to give a plant a lot more room — say, jumping from a 15cm pot straight to a 30cm one — usually backfires.
Why over-potting causes problems: in a much bigger pot, the soil without roots in it can’t dry out properly between waterings, since there’s nothing there to draw the moisture out. That keeps the area around the root ball persistently wet, which invites root rot and fungal growth — the same symptoms most overwatering advice is trying to help you avoid.
A good rule of thumb for sizing up:
- Move up only 2–3cm in diameter for most houseplants.
- For a severely root bound plant that’s been in the same pot for years, 4–5cm is the maximum.
- For large specimen plants, 5–8cm — but no more.
- For succulents and cacti, cap it at 2cm to avoid waterlogging in the extra soil.
Terracotta, Plastic, or Ceramic?
Terracotta: porous, letting moisture evaporate through the walls. Good for succulents, cacti, snake plants, and Mediterranean herbs that need soil to dry fast. Heavier, which helps stability for tall plants. More expensive but long-lasting.
Plastic: non-porous, so it holds moisture longer. Good for ferns, peace lilies, and other moisture-loving tropicals. Lighter, which makes moving large plants easier. Inexpensive and widely available.
Ceramic/glazed: porosity sits somewhere between terracotta and plastic depending on the glaze. Good for medium-needs tropicals. Heavy, which gives larger plants good stability.
Whatever you choose, the pot needs drainage holes — no exceptions. A pot without them will eventually cause root rot regardless of the soil mix or how carefully you water.
Best Soil for Repotting, by Plant Type
Matching the potting mix to the plant matters more than almost anything else here — the wrong mix will cause ongoing problems no matter how well you execute the rest of the process.
| Plant Type | Best Repotting Mix | Key Requirement |
|---|---|---|
| Succulents and cacti | Cactus mix + 30% pumice | Drains within seconds |
| Snake plant | Cactus mix + 30% perlite | Never stays wet |
| Peace lily | Potting mix + coco coir + perlite | Moisture-retentive but draining |
| Monstera and other aroids | Potting mix + perlite + bark | Airy and chunky |
| Ferns | Coco coir + perlite + compost | Stays consistently moist |
| Pothos and trailing plants | General potting mix + perlite | Balanced drainage |
| Orchids | Bark chips + perlite | Maximum aeration |
| Aloe vera | Cactus mix + pumice | Immediately draining |
Our complete soil mix guide covers exact ratios and simple ways to test your mix — worth reading before buying potting mix for repotting.
Tools You’ll Need
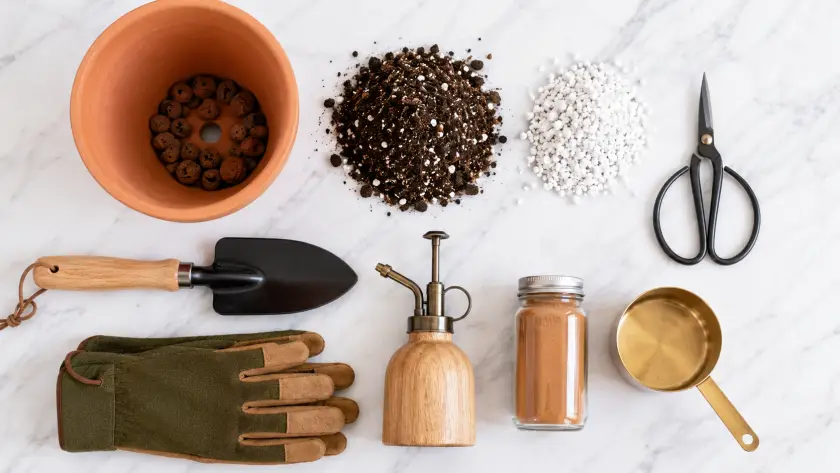
Essentials:
- A clean pot with drainage holes, sized 2–3cm wider than the current one
- Potting mix suited to the specific plant
- Clean scissors or pruning shears, for trimming roots
- A trowel or large spoon, for moving and packing soil
- Gloves, especially for spiny (cacti) or irritant (ficus) plants
- Newspaper or a tray, to contain spilled soil
- A watering can, for the post-repotting watering
Optional but handy:
- Rooting hormone powder, for dusting cut root surfaces
- Cinnamon, as a natural antifungal for cut surfaces
- Drainage crocks or gravel, for the base of the new pot
- Mesh, to cover drainage holes and keep soil in
How to Repot a Plant — Step by Step
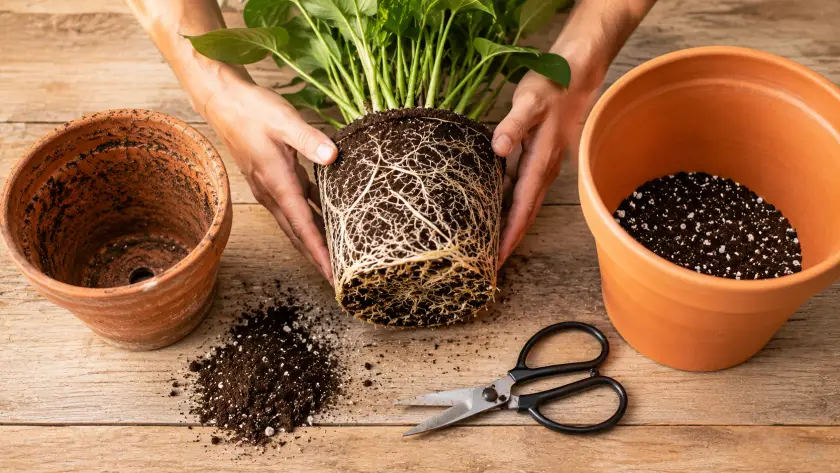
Step 1 — Water Thoroughly 24 Hours Before Repotting
Repotting is physically stressful for a plant: the roots get disturbed, some fine roots are inevitably lost, and the plant has to start establishing in unfamiliar soil right away. Watering 24 hours ahead reduces that stress:
- Well-hydrated roots are more flexible and less likely to snap during removal.
- A moistened root ball slides out of the old pot more easily.
- The plant goes into the process with fully turgid cells, giving it better reserves for the transition.
Don’t water right before repotting, though — soggy, waterlogged soil is heavy, messy, and more likely to fall apart, damaging fine root hairs. 24 hours lets excess moisture drain while keeping the roots hydrated.
Step 2 — Prepare the New Pot
Before removing the plant from its old pot, get everything ready:
- Add a layer of crocks, gravel, or large perlite at the base — covering the drainage holes without blocking them.
- Add a layer of fresh potting mix suited to the plant, enough that the plant will sit at the right final depth.
- Aim for the plant’s soil surface to sit 2–3cm below the pot rim, leaving room for watering without overflow.
Step 3 — Remove the Plant From Its Old Pot
For small to medium plants:
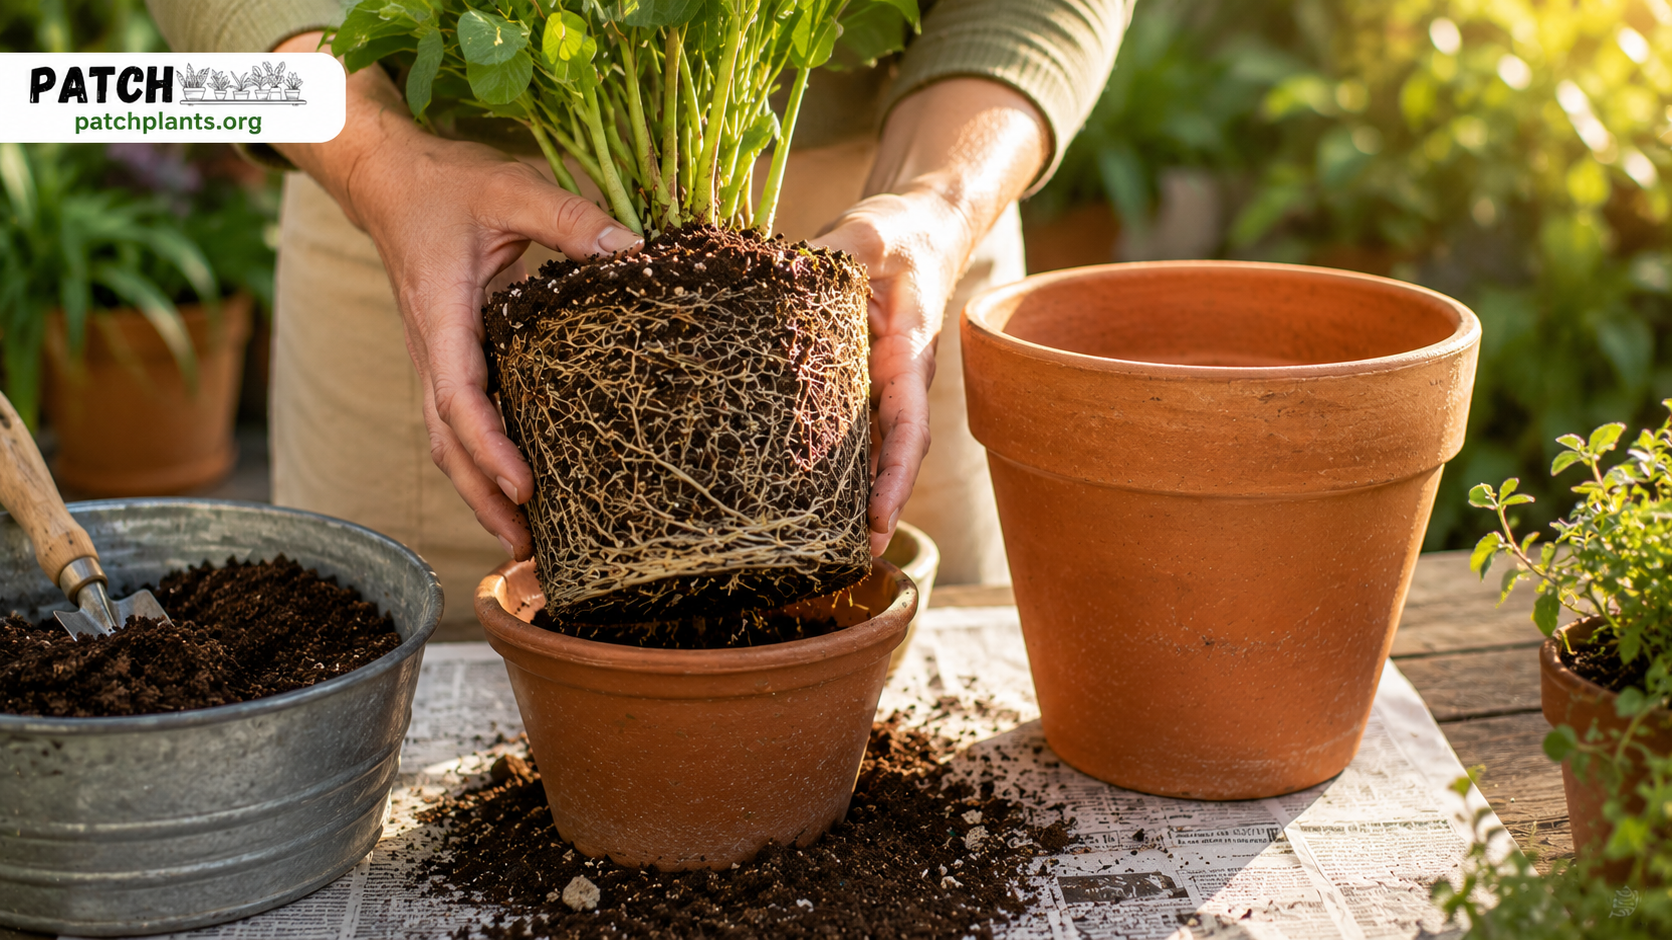
- Place one hand flat over the soil surface with the stem between your fingers.
- Tip the pot upside down.
- Squeeze the sides of a plastic pot gently to break the root-to-pot adhesion.
- For terracotta, run a thin knife or trowel blade around the inside wall to loosen the root ball.
- Slide the root ball free gently — if it resists, don’t force it. Run the knife around again.
For large plants:
- Lay the pot on its side.
- Tap the outside of the pot firmly all around.
- Have a second person support the plant while you ease the pot away from the root ball.
- Never pull the plant by its stems — always support the root ball instead.
If the root ball won’t release, slide a long knife or trowel blade around the full inner circumference of the pot. On terracotta pots that have been in place for years, that root-to-pot bond can be very strong.
Step 4 — Inspect and Prepare the Root Ball
Once the plant is free, examine the roots before placing it in the new pot:
Healthy roots: white or cream, firm, and flexible. Handle gently and leave them as they are.
Circling roots: dark, compacted roots that have grown in circles along the pot wall. Tease these outward with your fingers — breaking the circular pattern encourages outward growth into the new soil.
Dead or mushy roots: brown, soft, and foul-smelling — killed by rot or age. Remove completely with clean scissors, cutting back to firm tissue. If root rot is extensive, follow the full rescue steps in our guide on root rot: how to identify, prevent, and treat it.
Root pruning for large plants: if you don’t want to size up much, trimming up to a third of the root mass — the outermost circling roots — lets the plant stay in the same pot or move up only slightly. This works well for mature specimens already near their practical pot-size limit.
After trimming any roots, dust the cut surfaces lightly with cinnamon or rooting hormone powder to guard against fungal infection through the open wounds.
Step 5 — Remove the Old Soil
Shake off as much of the old potting mix as you can before repotting. This does a few things:
- Clears away exhausted, nutrient-depleted growing medium.
- Exposes the roots for a proper inspection.
- Lets the roots make full contact with fresh mix once repotted.
- Removes any pests or disease organisms that may be in the old soil.
For a severely root bound plant with tightly compacted roots, use a chopstick or pencil to gently loosen the root ball from the bottom up before shaking off the old soil.
Step 6 — Position the Plant in the New Pot
Center the plant in the prepared pot:
- Hold it at the right height, with the soil surface sitting 2–3cm below the pot rim.
- Add fresh potting mix around the sides in layers, rather than all at once.
- Gently press each layer around the roots to remove large air pockets that would let roots dry out.
- Keep adding soil until it reaches 2–3cm below the rim.
- Firm the surface gently — it should feel settled, not packed hard.
- Check that the plant sits centered and stable.
Depth matters: never bury the plant deeper than it was growing before. The crown — where stems meet roots — should sit at or just above the new soil surface. Burying the crown causes crown rot, especially in succulents, aloe, and snake plants.
Step 7 — Water Thoroughly and Let It Drain
- Water slowly and thoroughly, moving in circles around the pot so all the new soil gets wet evenly.
- Keep watering until water runs freely from the drainage holes.
- Let it drain fully — never leave a freshly repotted plant sitting in standing water.
- Return it to its usual spot.
Exception for succulents, cacti, and aloe vera: skip the immediate watering. Wait 5–7 days before the first watering, giving any cut roots time to callous over. Watering straight away raises the risk of rot through open wounds. Our guide to aloe vera care at home covers the full post-repotting routine for succulents.
Plant Care After Repotting — Aftercare Guide
Transplant Shock — What It Is and How to Manage It
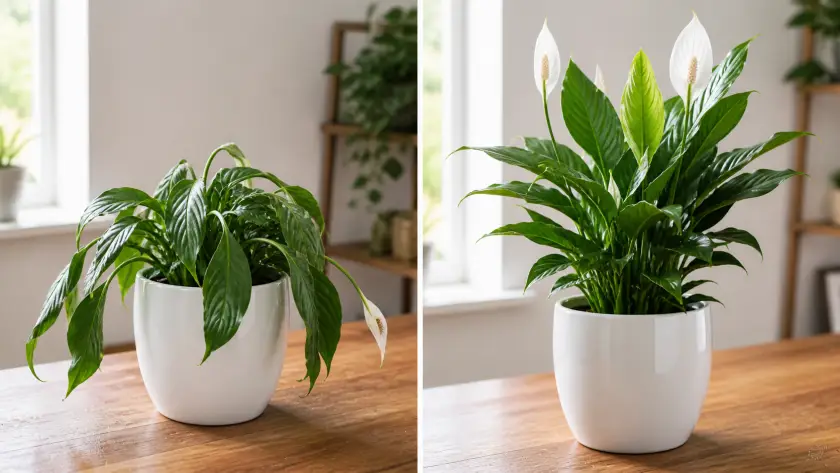
Transplant shock is the temporary stress response plants go through after repotting, caused by root disturbance, a change in growing medium, and the energy cost of establishing in new soil. It’s normal and expected, not a sign anything’s gone wrong.
Common symptoms: wilting or drooping even with correct soil moisture, temporary leaf drop (especially in root-disturbance-sensitive tropicals), yellowing of lower leaves, a pause in new growth, and slight leaf curl.
For most houseplants, symptoms resolve within 1–3 weeks. Large specimens, orchids, or plants with significant root damage can take 4–6 weeks. If symptoms worsen past 4 weeks, or you notice soft, mushy stems, check for root rot. Our guide on how to revive a dying plant covers emergency recovery if a plant isn’t responding normally after repotting.
How to Avoid Transplant Shock
Prevention starts before repotting even begins:
- Water 24 hours ahead — well-hydrated plants handle root disturbance better.
- Work quickly, limiting how long the roots are exposed to air.
- Handle roots gently to avoid breaking fine root hairs unnecessarily.
- Use the right potting mix — the wrong soil adds ongoing stress on top of transplant shock.
- Repot in spring when the plant’s metabolism is highest, for faster recovery.
- Move the plant to a slightly shaded spot afterward, easing the demand on a temporarily weaker root system.
Wilting, Yellowing, and Drooping After Repotting
Some wilting, yellowing, or drooping in the first 1–2 weeks is ordinary transplant shock — roots can’t yet supply water as efficiently as before. A few ways to tell normal from concerning:
Normal: soil feels appropriately moist, no odor, leaves droop but aren’t yellowing rapidly. Keep the plant in bright indirect light, water normally, and give it time.
Concerning: soil is wet or waterlogged, lower leaves are yellowing quickly, or there’s a musty smell from the pot — these point to root rot developing in overly wet new soil. See our guide on signs you’re overwatering and how to correct it for immediate steps.
Drooping with dry soil usually means the new mix is drying faster than expected — water slightly more often for the first 2–3 weeks. Drooping with wet soil means too much moisture around still-recovering roots — hold off watering and check for root rot if it persists. Our guide on why your plant’s leaves are turning yellow and our guide on leaf curl, browning, and drooping cover the full diagnostic process for either symptom.
Watering, Fertilizing, and the First Month
Week 1: water thoroughly right after repotting (except succulents — wait 5–7 days). After that, don’t water again until the top inch of soil is dry; check daily.
Week 2: keep checking daily. Most plants need water every 5–10 days, depending on pot size, light, and temperature.
Weeks 3–4: shift to the plant’s normal watering routine as the root system re-establishes.
Never water on a fixed schedule in that first month — use the finger test instead, since fresh potting mix holds moisture differently than the old, exhausted soil did. Our guide on worst times to water your plants covers optimal timing for every plant type.
Hold off on fertilizing for at least 4–6 weeks after repotting. Fresh potting mix already contains enough starter nutrients, and feeding a plant with temporarily compromised roots risks root burn. Our guide on fertilizing indoor vs outdoor plants covers feeding schedules once you’re past that window.
How to Repot Specific Plants
Snake Plant
When: every 2–3 years, or when roots emerge from drainage holes. Snake plants prefer being slightly pot-bound, so don’t rush it.
Pot size: up only 2–3cm — they bloom and pup more readily when snug.
Soil: cactus mix with 30% extra perlite. Skip standard potting compost.
Key technique: snake plants grow from a horizontal underground rhizome. When removing from the old pot, identify the rhizome and avoid cutting through it unnecessarily — this is also a good moment to divide, separating leaf clusters with their attached rhizome sections into new plants.
After repotting: hold off watering for 5–7 days to let any root cuts callous. Our snake plant care guide covers the full repotting and division process.
Peace Lily
When: every 12–18 months for active growers. Peace lilies tolerate moderate pot-binding but decline sharply once severely root bound.
Pot size: 2–3cm wider — they bloom best slightly pot-bound, so don’t over-pot.
Soil: general potting mix with added coco coir and perlite — moisture-retentive but still draining.
Key technique: a good time to divide — separate growth points with at least 2–3 leaves and attached roots each.
After repotting: water immediately and thoroughly; peace lilies don’t need the dry period succulents do. Expect 1–2 weeks of drooping while roots re-establish. Our peace lily care guide has the full aftercare routine.
Aloe Vera
When: every 2–3 years, or once pups are crowding the pot.
Pot size: 2–3cm wider — oversized pots with extra soil raise the risk of root rot.
Soil: dedicated cactus/succulent mix with pumice, so it drains within seconds.
Key technique: pups can be separated at repotting time once they’re at least 8–10cm tall with their own roots. Let both mother plant and pup cut surfaces callous 24–48 hours before planting.
After repotting: wait 5–7 days before the first watering. Our aloe vera care guide covers the full repotting and pup separation process.
Pothos
When: every 12–18 months — pothos fills pots quickly.
Pot size: 2–3cm wider. Trailing stems that have gotten long are worth trimming back at repotting time.
Soil: general potting mix with 20–30% perlite.
After repotting: water immediately and thoroughly — pothos rarely shows much transplant shock and typically resumes growth within 1–2 weeks. For display ideas once it’s repotted, see our guide on trailing plants that look stunning on shelves and bookcases.
Monstera
When: every 18–24 months for young plants, slowing to every 2–3 years once mature.
Pot size: 3–5cm wider for young plants; for mature, large specimens, top-dressing (replacing the top 5–10cm of soil) is often a better option than a full repot.
Soil: general potting mix with perlite and pine bark chips, for a chunky, airy structure.
Key technique: the brown, rope-like aerial roots don’t need burying — leave them or tuck them into the fresh mix if manageable, but never cut them; they help with moisture absorption and stability.
After repotting: water thoroughly and support the plant with a moss pole or stake if it’s grown top-heavy. Expect 2–3 weeks of slower growth while it settles in.
Spider Plant
When: every 12–18 months — a moderately fast grower that forms substantial root masses.
Pot size: 2–3cm wider. Spider plants actually bloom and pup more when slightly pot-bound.
Key technique: a good time to propagate — plantlets with small root nubs can be snipped off and potted separately. See our guide on how to propagate houseplants at home for the full process.
Succulents
When: every 2–3 years, or whenever root bound signs show up.
Soil: a cactus/succulent-specific mix with pumice or perlite, for near-instant drainage.
Root pruning: more often worthwhile here than with other plants — removing up to a third of old roots encourages fresh growth and delays root binding happening again too soon.
After repotting: always wait 5–7 days before watering, so cut surfaces fully callous. Keep in indirect light for 1–2 weeks, since direct sun on a freshly repotted succulent can add stress before the roots are established.
Repotting Large Plants
Mature specimens in pots over roughly 35cm get harder to repot as they grow, so a full repot becomes increasingly disruptive. Two useful alternatives:
Top-dressing: for large plants that aren’t severely root bound, swap the top 5–10cm of old mix for fresh, giving a nutrient and structure boost without the stress of a full repot. Do this annually in spring.
Pot-in-pot (root pruning in place): for very large plants where repotting is genuinely impractical, trimming the outer root layer and returning the plant to the same or a barely larger pot can extend the gap between full repots by 2–3 years.
For display ideas once a large plant is repotted, see our guide on how to create an indoor jungle without overcrowding.
Indoor vs Outdoor Plant Repotting
Indoor and outdoor container repotting share the same fundamentals, but timing and aftercare differ slightly. Indoor plants can usually be repotted in any season as long as they’re actively growing, since placement afterward is a stable, bright indoor spot. Outdoor and patio plants benefit more strictly from spring repotting, since they’ll face wind, temperature swings, and direct sun that can add to transplant shock if repotted at the wrong time. For specific guidance on patio and container specimens, see our guide on the best plants for container gardening on patios.
Common Repotting Mistakes
Going Up Too Many Pot Sizes
Sizing up by more than 2–3cm at once leaves excess soil around the root ball that stays wet, creating the exact waterlogged conditions that cause root rot no matter how carefully you water. Increase pot size incrementally.
Using the Wrong Potting Mix
Using the same mix for every plant is one of the most common repotting errors. Cactus mix for succulents and snake plants, moisture-retentive mix for peace lilies and ferns — match it to the plant. Our soil mix guide covers every combination.
Watering Succulents Immediately After Repotting
Succulents, cacti, and aloe vera shouldn’t be watered for 5–7 days after repotting — any root cuts need to callous before contact with water. Watering right away invites rot through the open wounds.
Repotting at the Wrong Time
Repotting in winter outside of emergencies, repotting a flowering plant and losing the buds, or repotting a newly bought plant before it’s adjusted all cause avoidable stress. Stick to the seasonal guidelines above.
Fertilizing Too Soon
Feeding within the first 4–6 weeks after repotting risks root burn through open wounds in fresh soil. Wait the full 4–6 weeks before resuming.
Burying the Plant Too Deep
Burying the crown deeper than the plant was previously growing causes crown rot — a particular risk for succulents, aloe, and snake plants. The crown should sit at or slightly above soil level.
Not Checking for Root Rot First
Repotting a plant with root rot into fresh soil, without removing the affected roots first, just moves the problem into new medium. Inspect the roots thoroughly and treat any rot before placing the plant in its new pot. Our guide on root rot: how to identify, prevent, and treat it is worth reading first if you suspect rot.
Frequently Asked Questions
When is the best time to repot plants?
Early spring — March through May — when plants are entering active growth and recover fastest from transplant shock. Summer works with extra care; winter should be reserved for emergencies.
How do I know if my plant is root bound?
Look for roots growing from drainage holes, soil drying within 24–48 hours of watering, water running straight through without absorbing, stunted growth despite good care, a plant that’s become top-heavy or unstable, and roots visibly circling the soil surface. Two or more of these together confirm repotting is needed.
Should I repot a new plant right away?
No — give it 2–4 weeks minimum to adjust before repotting a newly bought plant. Combining the stress of a new environment with repotting stress sets the plant back more than waiting a few weeks.
How long does transplant shock last?
For most houseplants, symptoms like wilting, drooping, temporary leaf drop, and yellowing resolve within 1–3 weeks. Large specimens or plants with more root damage can take 4–6 weeks. If symptoms worsen past 4 weeks, check for root rot.
How often should I repot plants?
It depends on growth rate. Fast growers like pothos and philodendron need repotting every 12–18 months, medium growers like peace lily and snake plant every 18–24 months, and slow growers like ZZ plants and cacti every 2–3 years. Let the plant’s own signs guide the timing rather than sticking to a fixed schedule.
Related Guides on Patch Plants
- Snake Plant Care Guide — Complete Repotting & Care
- Peace Lily Care Guide — Complete Spathiphyllum Tips
- Aloe Vera Care Guide — Growing, Gel & Benefits
- Root Rot — How to Identify, Prevent and Treat It
- Best Soil Mix for Every Type of Plant
- Worst Times to Water Your Plants
- How to Propagate Houseplants Easily at Home
- Signs You Are Overwatering — How to Fix It
- Why Your Plant Leaves Are Turning Yellow
- How to Revive a Dying Plant — Step by Step
- Leaf Curl, Browning & Droop — What Your Plant Is Telling You
- Fertilizing Indoor vs Outdoor Plants — The Difference
- Complete Watering Guide for Healthy, Thriving Plants
- Browse All Indoor Plant Guides
Final Thoughts
Repotting isn’t just maintenance — it’s one of the most meaningful things you can do for a houseplant’s long-term health. Moving a root bound plant out of exhausted soil and into fresh mix, with room to grow and the conditions it needs, genuinely changes its capacity to thrive for years to come.
The signs are always there if you look for them: roots at the drainage holes, soil that dries too fast, growth that’s stalled. And once you understand the process — right timing, right pot size, the right soil, a careful root check, and sensible aftercare — it’s far less intimidating than it first appears.
I’m Sawera Shahid, a botanist, and I write about plant care for Patch Plants because I’d rather people feel confident repotting a plant than afraid of killing it. Start with one plant, follow the steps, and watch it respond — new roots, new leaves, a visibly healthier plant within weeks. Then work through the rest of your collection the same way, as the signs appear.
According to the Royal Horticultural Society, regular repotting is one of the maintenance tasks most likely to extend a plant’s lifespan and improve its health — making it one of the better returns on time and effort in any plant collection.